

An RV solar power system is defined as a four-component energy chain that captures sunlight, regulates it into safe charging current, stores it in a battery bank, and delivers it as usable electricity to your RV’s devices. The system relies on solar panels, a charge controller, a battery bank, and an inverter working in sequence. Solar panels serve purely as charging sources; the battery bank powers all RV loads including lights, appliances, and electronics. Technologies like MPPT charge controllers and LiFePO4 batteries now define the standard for new builds in 2026. Understanding how rv solar power system works gives you the confidence to choose the right setup, avoid costly mistakes, and enjoy true off-grid freedom on the road.
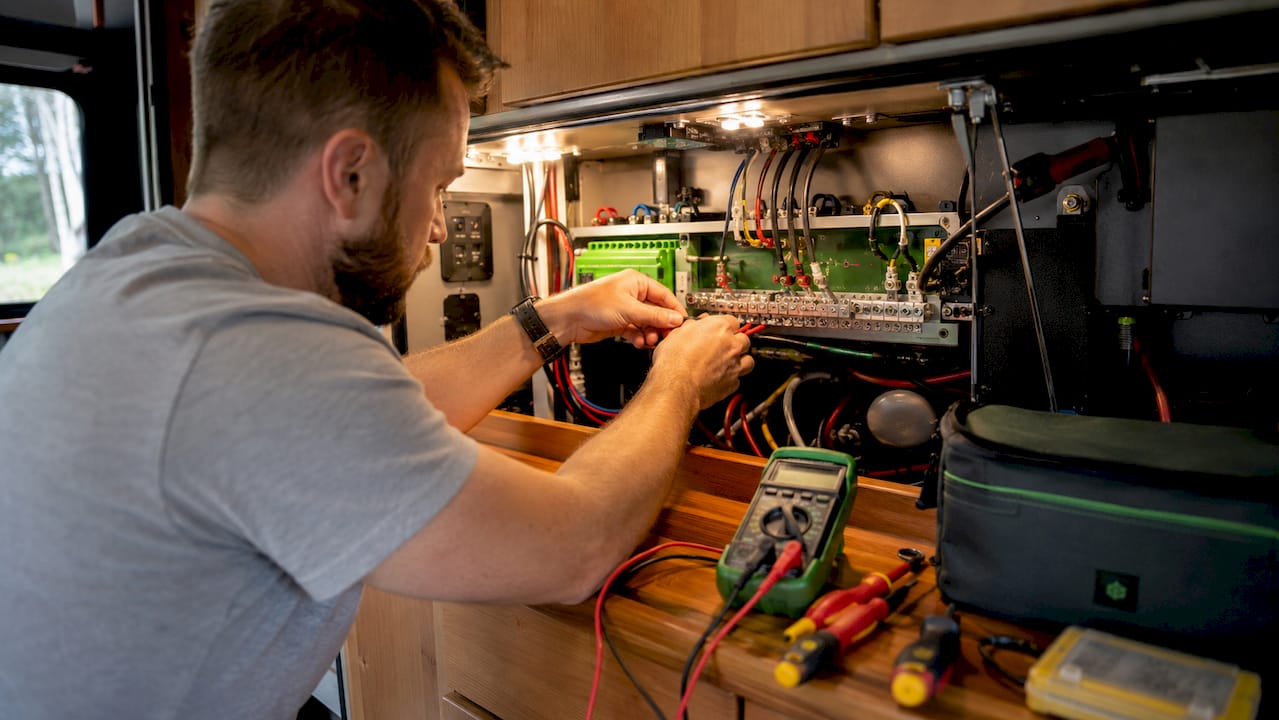
What are the main components of an RV solar power system?
Every RV solar panel setup depends on four core components. Each one plays a specific role in the energy conversion and storage process.
- Solar Panels: Panels convert sunlight into direct current (DC) electricity through photovoltaic cells. Monocrystalline panels are the most efficient option for RV rooftops where space is limited.
- Charge Controller: The controller sits between the panels and the battery bank. It regulates voltage and current to prevent overcharging and battery damage. Two types exist: PWM (Pulse Width Modulation) and MPPT (Maximum Power Point Tracking). MPPT is the better choice for systems above 100W.
- Battery Bank: Batteries store the energy generated by your panels. LiFePO4 batteries provide 2–3 times usable capacity per weight and 5–10 times longer cycle life compared to lead-acid batteries. That means fewer replacements and more reliable power over the life of your RV.
- Inverter: The inverter converts DC power from the battery bank into 120V alternating current (AC) for standard household appliances. Without an inverter, you can only run 12V DC devices directly.
One detail many first-time buyers miss: DC and AC circuits are separate in an RV. Your solar system produces DC, which runs 12V devices like LED lights and fans directly. AC appliances like microwaves and laptops need the inverter in the loop. Knowing this separation prevents wiring errors and helps you plan your load management from day one.
How does energy flow through an RV solar system step by step?
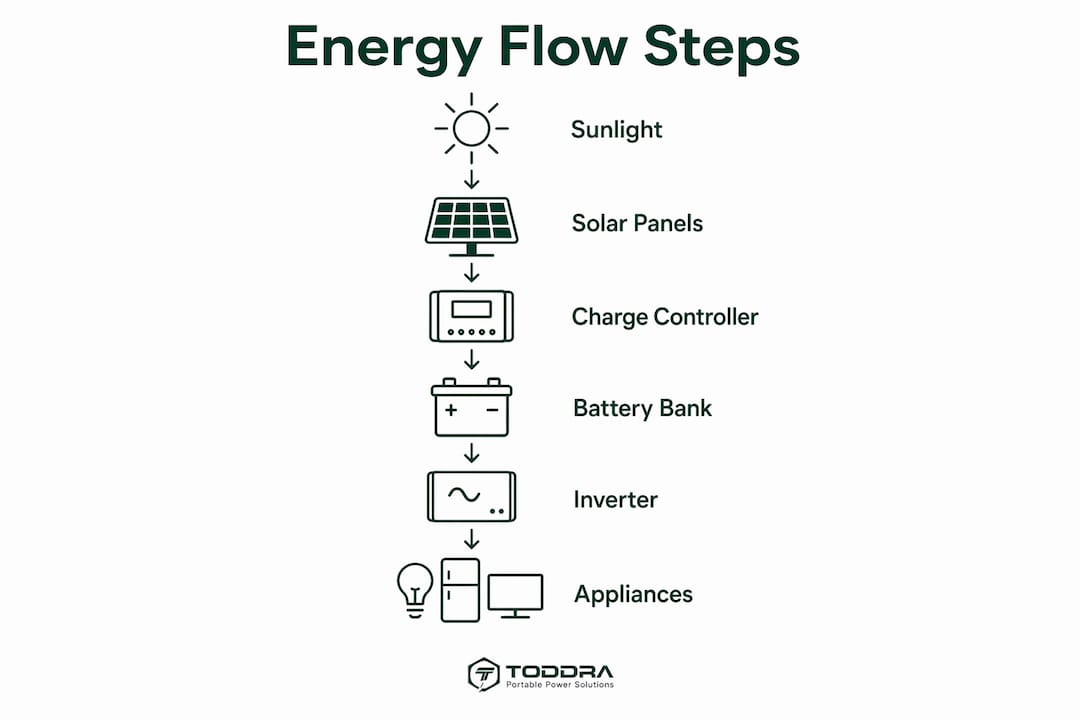
Understanding the operational workflow from sunlight to powered appliances makes the whole system easier to manage and troubleshoot.
- Sunlight strikes the solar panels. The photovoltaic cells generate DC electricity. Output varies with sun angle, cloud cover, and panel temperature.
- DC power travels to the charge controller. The controller reads the battery’s state of charge and adjusts the incoming current. This step protects the batteries from voltage spikes and overcharging.
- The battery bank stores the energy. Batteries hold power for use at night, on cloudy days, or whenever panel output drops below demand.
- 12V DC devices draw directly from the battery bank. Lights, fans, water pumps, and USB chargers all run on this circuit without any conversion.
- The inverter converts DC to 120V AC. Appliances like coffee makers, microwaves, and televisions draw from the inverter’s AC output.
- The cycle repeats each day. Panels recharge the batteries during daylight hours, and the system self-regulates through the charge controller.
A critical point most guides skip: solar panels do not directly power appliances. The battery bank is always the power source. Panels simply replenish what you use. This means battery health and capacity determine your system’s real-world performance more than panel wattage alone.
Pro Tip: Run your highest-draw appliances during peak sun hours, roughly 10 a.m. to 2 p.m. This lets the panels partially offset the load in real time, reducing the net drain on your batteries.
MPPT vs. PWM and battery chemistry: what actually affects performance?
Technology choices inside your RV solar system components have a direct impact on how much energy you actually use versus how much you lose.
MPPT vs. PWM charge controllers
MPPT controllers recover 15–30% more energy than PWM controllers under typical RV conditions. MPPT efficiency runs 93–97%, while PWM falls short for any system above 100W. That gap translates to real minutes of extra runtime for your refrigerator or phone charger every single day.
| Feature | MPPT Controller | PWM Controller |
|---|---|---|
| Efficiency | 93–97% | Lower, especially above 100W |
| Best for | Systems over 100W | Small or budget systems |
| Energy recovery | 15–30% more than PWM | Baseline |
| Cost | Higher upfront | Lower upfront |
| Panel voltage flexibility | High | Limited |
Battery chemistry comparison
LiFePO4 (lithium iron phosphate) is the recognized industry standard for new RV solar installations as of 2026. Lead-acid batteries remain common in budget builds, but the tradeoffs are significant. LiFePO4 offers weight savings, deeper discharge capability, and far longer service life. The higher upfront cost pays back through fewer replacements and more usable capacity per charge cycle. You can explore LiFePO4 expansion options if you need to scale storage without replacing your whole system.
Inverter type and panel mounting
Pure sine wave inverters are the correct choice for sensitive electronics like laptops, CPAP machines, and modern televisions. Modified sine wave inverters cost less but can damage or shorten the life of those devices. A 2,000W pure sine wave inverter handles common RV loads like microwaves and coffee makers. Air conditioning requires a 3,000–5,000W inverter or charger combo. Understanding how a solar inverter works helps you match the right unit to your appliance list.
Mounting panels with an air gap for ventilation improves performance by keeping panels cooler. Panels mounted flat on RV roofs trap heat and produce less power. Even a small gap makes a measurable difference on hot summer days.
Pro Tip: When installing solar panels on your RV roof, use tilt mounts or at minimum raise the panel slightly off the surface. Cooler panels produce more power, and the airflow also protects your roof membrane from heat damage.
How do you size an RV solar system for your needs?
Sizing your RV solar panel setup correctly prevents both energy shortages and wasted spending on oversized components.
Estimating your daily energy use
Start by listing every device you run in a typical day. Multiply each device’s wattage by the hours you use it. Add those numbers together to get your daily watt-hour (Wh) demand. A typical RV with LED lighting, a 12V refrigerator, phone charging, and a laptop might use 600–900Wh per day. Add a microwave or air conditioner and that number climbs fast.
| Appliance | Typical Wattage | Daily Use (hours) | Daily Wh |
|---|---|---|---|
| LED lights (4 fixtures) | 40W | 4 | 160Wh |
| 12V refrigerator | 50W | 24 | 1,200Wh |
| Laptop | 65W | 3 | 195Wh |
| Microwave | 1,000W | 0.25 | 250Wh |
| Phone charging | 20W | 2 | 40Wh |
Matching panels, batteries, and inverter
- Solar panels: A 400W panel array in good sun conditions produces roughly 1,600–2,000Wh per day. Most RV roofs fit 2–4 panels depending on size.
- Battery bank: For weekend boondocking, 100–200Ah of LiFePO4 capacity covers most moderate users. Extended off-grid trips of 5 or more days call for 300Ah or more.
- Inverter sizing: Match your inverter to your largest single load, not your total load. A 2,000W inverter covers most RV needs except air conditioning.
- Balance matters: Oversizing panels without matching battery capacity wastes potential energy. Undersizing batteries relative to your daily use leaves you short after sunset.
For reliable energy storage on longer trips, plan for at least two days of battery capacity without any solar input. This buffer protects you during cloudy stretches.
What are the best practices for installing and maintaining your RV solar system?
Installing solar power on an RV correctly from the start saves you from expensive repairs and safety hazards down the road.
- Connect in the right order. Always connect the battery to the charge controller first before connecting the solar panels. This allows the controller to detect system voltage and initialize correctly. Reversing this sequence can permanently damage the controller.
- Seal every roof penetration. Use professional-grade self-leveling lap sealant on every cable entry point. Water intrusion from a poorly sealed roof hole causes far more damage than most electrical mistakes.
- Check for heat spots after startup. Heat detected on wiring or connectors during operation signals unsafe resistance. Loose or undersized connections are a fire hazard and must be corrected immediately.
- Inspect connections every 3–6 months. Road vibration loosens terminals over time. A quick visual check and torque test on all connections keeps the system running safely.
- Monitor battery temperature and charge profiles. LiFePO4 batteries have built-in battery management systems (BMS), but extreme cold or heat still affects performance. Avoid charging below freezing without a heated battery or a controller with low-temperature cutoff.
Pro Tip: After your first full day of system operation, run your hand along every wire and connector. Any warmth you feel beyond ambient temperature means a connection needs to be tightened or a wire needs to be upsized.
Key takeaways
An RV solar power system works because panels charge batteries, the charge controller protects the bank, and an inverter delivers AC power to your appliances on demand.
| Point | Details |
|---|---|
| Batteries power the RV, not panels | Solar panels only recharge the battery bank; the bank supplies all actual loads. |
| MPPT controllers outperform PWM | MPPT recovers 15–30% more energy, making it the right choice for systems above 100W. |
| LiFePO4 is the 2026 standard | LiFePO4 batteries offer 2–3x usable capacity and 5–10x longer cycle life than lead-acid. |
| Connection order prevents damage | Always connect battery to charge controller before connecting solar panels. |
| Size batteries for two days of backup | Plan battery capacity to cover at least two sunless days to handle cloudy weather safely. |
What i’ve learned after years of working with RV solar setups
Most people shopping for their first RV solar system fixate on panel wattage. I understand the instinct. More watts sounds like more power. But in practice, the battery bank is where your system either succeeds or fails.
I’ve seen 400W panel arrays paired with undersized lead-acid batteries that left owners without power by 9 p.m. every night. I’ve also seen modest 200W setups with quality LiFePO4 banks that ran comfortably through three cloudy days without a recharge. The battery is the foundation. Panels are just the refueling mechanism.
The other thing that surprises people is how much difference a quality MPPT controller makes in real conditions. On a clear day, the gains are modest. But on a partly cloudy day with fluctuating light, an MPPT controller is constantly hunting for the optimal power point. That 15–30% recovery advantage is most valuable exactly when you need it most.
My honest advice on inverters: buy pure sine wave from the start. The price difference is smaller than it used to be, and you will not regret protecting your electronics. A modified sine wave inverter that damages a CPAP machine or a laptop costs far more than the savings.
Finally, maintenance is simpler than most people think. Check your connections every few months, keep your panels clean, and watch your battery’s state of charge. Small habits protect a significant investment.
— Jackson
Power your RV adventures with Toddra
Toddra carries a carefully selected range of portable power stations and solar generators built for exactly the kind of off-grid RV life this article describes. Whether you need a compact unit for weekend trips or a high-capacity system for extended boondocking, Toddra’s lineup includes options with LiFePO4 batteries, pure sine wave inverters, and solar compatibility right out of the box. The Jackery Solar Generator 2000 Plus delivers 3,000W of output with 2,042Wh of capacity, covering most RV loads with room to spare. Browse the full solar generators collection at Toddra to find the right fit for your rig and your road.
FAQ
What does an RV solar power system actually do?
An RV solar power system captures sunlight through panels, stores the converted DC electricity in a battery bank, and delivers power to 12V devices directly or to AC appliances through an inverter.
How many solar panels does an RV need?
Most RVs with moderate energy use need 2–4 panels totaling 400–800W, paired with 100–300Ah of LiFePO4 battery capacity depending on how many days off-grid you plan to spend.
What is the difference between MPPT and PWM controllers?
MPPT controllers recover 15–30% more energy than PWM controllers and are the correct choice for any system above 100W. PWM controllers work for small, budget setups only.
Can RV solar power an air conditioner?
Yes, but air conditioning requires a 3,000–5,000W inverter or inverter-charger combo along with a large battery bank, since AC units draw far more power than typical RV appliances.
How often should you maintain an RV solar system?
Inspect wiring connections and check for heat spots every 3–6 months. Clean panels regularly and monitor battery charge profiles to catch issues before they become serious problems.